Showing posts with label busy. Show all posts

Saturday, July 2, 2016

adoption memorial

a couple months ago deb and i began a new public art commission. its is a commemorative public art memorial for past forced adoption. we were working with relationships australia in consultation with a local community group who have been affected by forced adoption practises. needless to say it was a very serious, and troubling topic. we met many lovely people during the process and heard many sad and incredible personal stories along the way.


for such a serious subject we approached the design of the memorial to be one with some substance and weight to it, literally.


we began making trip 2 hours north to a local quarry to find the right bit of black granite for the job.


this was way back at the beginning of the year, and we would be driving up to the dry quarry in the heat of the day, and walking around looking for the perfect stone.


we made quite a few trips, looking for the right one.
 

this one was on hold for us for a bit, but it wasnt quite right


 we got to know the guys working at the quarry and they got to know what we were looking for in a rock.


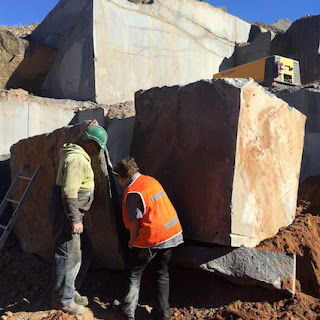
one day we got he call to come up to the quarry, they thought they found the rock we were looking for. this is deb checking out the rock while it was still in the pit, looking at the natural break in the stone. exactly what we were after.


here is the beautiful stone after it was brought up from the quarry, with a lovely natural front face. the concept for the artwork was simple, to take a solid bit of rack and crack it into 2 pieces, force-ably separating the 2 bits that had been together for thousands of years.
 

to separate the stone we needed to control the break, so it broke as we wanted it to. to do this we had the quarry drill a line of vertical holes along the point we wanted it to break.


then some metal wedge shaped things plugs called feathers were put into the holes and gently tapped into the rock. as the wedge went further into the rock the pressure causes it to crack.
 

it happens slowly and you can hear the rock cracking as it goes.
 

the rock now in 2 pieces.
 
from here we had some more work to do on the rock. we ended up working a couple sides of the rock. 2 sides we kept looking natural and just exfoliated the surface a bit more using heat.


the third side we wanted to polish so we had it wire cut and the began polishing it by hand .
 

you can see in this photo the rock in 2 pieces at the stone memorial place where we hired some space for this project.
 

then deb and myself spent over a week in front of this rock grinding the surface. the whole surface is marked up in yellow and then you grind it off (so yo know what areas you have done)


we kept grinding and grinding.
 

these are the diamond pads we used going from 50 grit up to 3000 grit.
 

this is the 300 finish. we were so proud of ourselves for getting to this point.


then one of the stone workers came and did the next step which was polishing using a compressed pad of camel hair and a polishing agent.
 

this really made the surface shine and is what the industry calls "sealing the rock"
 

it was a nice last step on the side face


now you could see your reflection in the rock! so much better than we imagined.
 

deb and myself at the end of the polishing, happy as
 

the last thing to do was engrave a sentence that explains the memorial onto the polished surface. now it is ready for install.

installation phase next time

Monday, June 27, 2016

terrazzo and excuses

ok - i know it has been a while. life just got a bit too busy. too much happening. but i have still been documenting it, just not having any time to post things here. I will attempt to catch up over the next couple weeks. that was the excuse.

first to what i am doing now. here is the terrazzo.


 deb and i were successful in securing a public art job for the city council. we designed a tree image that will be made from brass lines set in terrazzo. this will be set along the foot path in front of the city council building.


we started by creating a template that is to scale for us to draw the pattern out on
 

we drew the tree pattern onto the template


then we used this to bend and lay out the brass strips to make up the drawing.


as we often do when working on a public art project, we have partnered up with a local fabricator who works with concrete and terrazzo all the time. he is helping us source materials, create the concrete colours and mixes and install the terrazzo.


in the meantime we have been busy writing safe work method statements, getting work permits, and planning and coordinating all the background prep stuff to get this job started. The base concrete slab was poured last week. Now we just need a few sunny days in a row so we can begin to layout the brass pattern and then start the coloured aggregates. 

watch this space for more updates soon.

Monday, May 11, 2015

bronze casting

the concrete drawings that we have made will be set in place and then some bronze and glass sculptural elements will be set on top of them. there will be bronze cast buckets that have glass "water" inside the buckets.

to make the bronze we contracted our friend tom who is a talented wax maker, mold maker and bronze caster. we had to find the buckets and chair that we wanted reproduced in bronze.

tom did heaps of work before the actual casting day making the molds of the real objects then waxes, then the casting system and setting these into molds ready for the bronze casting day. these are photos from that day.
 

above are the molds that were in the kilns, melting out the waxes and heating the molds up ready for the pour.


the molds are re-enforced with burlap soaked in plaster that are wrapped around them. this is an extra measure in case the mold breaks with the hot metal in it.


the furnace that holds the crucible with the bronze in it is roaring away in the background. bits of bronze are set on top to make sure any moisture evaporates off and then tom loads the bronze bits into the crucible to melt.


meanwhile the molds are flipped and set into place in a sand pit, the openings kept covered until it is time to pour to keep them clean.


here are the raw bronze bricks that were purchased for the casting.


once the bronze is ready, the guys who are pouring the liquid metal get geared up in protective clothing.


the crucible is lifted out of the furnace, and then set into a pouring bar.


the pouring bar is then lifted over the molds and the bronze is poured out. i dont have any photos of this as i had to operate the overhead crane that assisted with lifting the full crucible. but it all happens pretty quickly, moving from one mold to the other pouring the bronze in. the bronze pours really easily, like milk.


here are the molds that have been filled, the hot bronze still glowing.


after a little bit it visually cools down to a grey colour, but they are still way too hot to touch


the excess bronze is recast into metal frames to make bricks for next time.

all in all it took a full afternoon to get the bronze cast.

Sunday, March 22, 2015

concrete drawing test panel reveal

we left the test panel to set for a few days


then came back and removed the form board ready to try and release our test tile from the concrete base.

one last thing that was done when we poured in the backing concrete was to insert these large lifters, they look like giant zipper tabs.


we connected the chains and lifted the whole thing both panel and base a few inches, then john tapped the base to try and release the panel. it was a tense few minutes.


and then pop and thud, the panel popped up and the base bed of concrete made a thud as it dropped away.
 

using the crane the panel was lifted up

and then moved across the workshop


this is what the base concrete looked like after, some of the oxides left on it but for the most part ok.


the test panel is set down on a pallet ready to inspect.

some of the base concrete bed remained stuck to our test tile but we were able to scrape that off

and this is the final result. it is pretty good. we were happy with the result. the colours are good, they will change a but more as it continues to dry out over the next few days.

this is the panel wet. we learned a lot doing this panel. next is to get it slip tested (more on that later)  and then if we pass that then we can begin one of the real artworks.