Showing posts with label making. Show all posts

Monday, July 25, 2016

terrazzo tree public artwork

in march this year deb and i put our hands up for a public art job. and we were lucky enough to get the gig. and so began our path towards learning about and installing a large terrazzo floor artwork in front of the adelaide city council building.


we contacted a local company monterrazzo and worked out a plan on how to make our design in terrazzo.
 

i posted previously about the process to get the design drawn up.  so it was an exciting day when we began laying the brass down on site. a base slab with the reinforcements had already been poured to the right level and allowed to set up for a week or so


we brought our pre bent and braised brass drawing to site on large mdf panels.
 

it was like a large puzzle to put together
 

after a couple hours we were making progress and setting the brass in place with nails and glue.
 

we previously did some colour tests and mixed different oxides and aggregates together to make the colours for our design. for this project we are using locally sourced stones in the terrazzo.
 

and then the 'boys' began the time consuming task of placing the terrazzo mixture in the areas of the design in between the brass strips.
 

this is the off white colour in the tree trunk section.
 

then once it is in place the 'boys' keep revisiting the surface, filling in all the gaps and taping the terrazzo to get the air out.


after that we wait for it to set
 

hope it doesnt rain and get ready to do it again tomorrow


so happy after that first colour was in, 
 

the next colour was a dark green, again with natural stone aggregates mixed in.
 

at the base with the 2 colours coming together.


a very time consuming but relatively straightforward process. we really enjoyed watching it be filled in.


this second colour took a few days to get down as it covered a large area of the design
 

and it started to rain, so we were delayed a bit even though we did all we could to try and make a dry space to work. 


terrazzo does not like the rain, cold or extreme hot temperatures, so that makes it hard to install outside in winter, but we managed
 
  
of course we had to put our signature in the work

the artwork is in place to commemorate the 175 years of the city council, and compliment the current council initiative to create green spaces in the city. 


our idea was a tree that was green, and had 175 branch ends, one for each year.


the third colour mix was a lighter green, to come in a meet the darker green.


again this colour took a few days to be set into place.


our team worked well and we made some great progress even despite it being the wettest June in a long time with records rain falls. not ideal conditions


one colour left to mix and install across the top of the design. at this point it all looks very flat and you cant see the aggregate yet.


we ground back a small area that had set up already to see what the finished product would look like


this is the sneak peak of what the finished surface will look like with the different mixes of stone aggregates and cement mix. we were so happy at this point. more about this project soon.

Saturday, July 2, 2016

adoption memorial

a couple months ago deb and i began a new public art commission. its is a commemorative public art memorial for past forced adoption. we were working with relationships australia in consultation with a local community group who have been affected by forced adoption practises. needless to say it was a very serious, and troubling topic. we met many lovely people during the process and heard many sad and incredible personal stories along the way.


for such a serious subject we approached the design of the memorial to be one with some substance and weight to it, literally.


we began making trip 2 hours north to a local quarry to find the right bit of black granite for the job.


this was way back at the beginning of the year, and we would be driving up to the dry quarry in the heat of the day, and walking around looking for the perfect stone.


we made quite a few trips, looking for the right one.
 

this one was on hold for us for a bit, but it wasnt quite right


 we got to know the guys working at the quarry and they got to know what we were looking for in a rock.


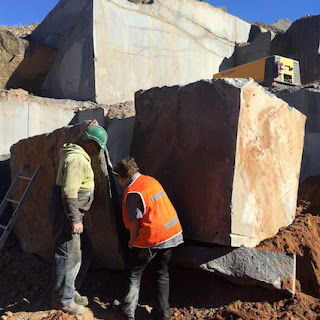
one day we got he call to come up to the quarry, they thought they found the rock we were looking for. this is deb checking out the rock while it was still in the pit, looking at the natural break in the stone. exactly what we were after.


here is the beautiful stone after it was brought up from the quarry, with a lovely natural front face. the concept for the artwork was simple, to take a solid bit of rack and crack it into 2 pieces, force-ably separating the 2 bits that had been together for thousands of years.
 

to separate the stone we needed to control the break, so it broke as we wanted it to. to do this we had the quarry drill a line of vertical holes along the point we wanted it to break.


then some metal wedge shaped things plugs called feathers were put into the holes and gently tapped into the rock. as the wedge went further into the rock the pressure causes it to crack.
 

it happens slowly and you can hear the rock cracking as it goes.
 

the rock now in 2 pieces.
 
from here we had some more work to do on the rock. we ended up working a couple sides of the rock. 2 sides we kept looking natural and just exfoliated the surface a bit more using heat.


the third side we wanted to polish so we had it wire cut and the began polishing it by hand .
 

you can see in this photo the rock in 2 pieces at the stone memorial place where we hired some space for this project.
 

then deb and myself spent over a week in front of this rock grinding the surface. the whole surface is marked up in yellow and then you grind it off (so yo know what areas you have done)


we kept grinding and grinding.
 

these are the diamond pads we used going from 50 grit up to 3000 grit.
 

this is the 300 finish. we were so proud of ourselves for getting to this point.


then one of the stone workers came and did the next step which was polishing using a compressed pad of camel hair and a polishing agent.
 

this really made the surface shine and is what the industry calls "sealing the rock"
 

it was a nice last step on the side face


now you could see your reflection in the rock! so much better than we imagined.
 

deb and myself at the end of the polishing, happy as
 

the last thing to do was engrave a sentence that explains the memorial onto the polished surface. now it is ready for install.

installation phase next time