Showing posts with label artist residency. Show all posts

Saturday, April 6, 2013

cup exhibition

i am part of a group exhibition that opens in 2 weeks. there are 73 artists in the show and 365 cups. all the artists have had some connection to the JamFactory and it is part of the 40th anniversary celebrations for them Jam.

the cups i decided to include in the exhibition are part of a larger piece. When i did an artist residency in the UK i made this piece.


it is a visual diary that ran for 3 months. i made 90 cups and then did a drawing on one a day for the duration of my residency.


this is one week from that 3 month period. it is from when i went to Delhi India as part of the residency.


to freshen up the piece and hold then together i had this wooden board made that located each cup on the board.
 

i think they look good, and i hope that they will stand out in the show.

Monday, March 4, 2013

life is too busy

lately life has been too busy. and normally i like busy, in fact i am not really great when i have nothing to do. i like to have a few tasks i could do on hand all the time. but lately life is too busy. busy with good things, work mostly, new collaborations, commissions, and writing. i have been spending a lot of time in front of a computer, writing, or making concepts in photoshop. not my favorite thing to do all the time. 

that is why i have not been blogging much lately, because most of the stuff i have been doing is just not the kind of stuff you can blog about, more computer work.

i did however go to the photographers last week and got some of the work i made during my residency last year professionally shot. i think they look good. these images will be included as support material in a grant application i am currently writing. so really this is just more work but at least there are good images so i can blog about it.


hand cut stencils, sandblasted and hand painted enamels


various enamel techniques used


a potential new product made from scraps from another process


potential new product idea


and again


and a detail


mini wrap ups
 

 green family of wrap ups


black family of wrap ups
 

blue collection or wrap ups


and a collection of my favorite ones.


i will try and blog more stuff soon - promise.

Saturday, January 19, 2013

new product prototype

while i was away at my residency at canberra glassworks i had this idea for a new production line of glass.  in my studio i have boxes and boxes of flat glass that has a white background and a thin layer of bold colour. i have decided to use this glass to make a new production line. or a limited series. 


the idea is to sandblast a pattern or image or drawing into the surface of the glass. like this line drawing. it is simple but the white and bold colours it will work quite well, and be catchy but not offensive.
 

the next step is to shape the glass (probably square, maybe rectangular too I am still working on this detail) and then slump the glass into a round mold to create a dish shape.
 

the finished product will be like this. the object in the top right corner is the blank object without any sandblasting. i hope this will be a good way to make some extra cash, get me in the studio making and maybe even be the start of some new exhibition work. 

i need to get a couple molds, some new stencil material and the most important item, some more uninterrupted time in the studio to make some of these. but at least i have a plan now.

Tuesday, December 4, 2012

last bit of cold working and packing - done!

yesterday started with a couple hours of cold working. i wanted to get all my work cold worked before it was packed. 


i had these smaller tiles, that will be used for enamelling and sandblasting. i smoothed out the edges, so they are ready for the stencils to be applied.
 

i also finished these 16 large squares to cold work. they will make up one large or 2 smaller wall pieces. again i smoothed out the edges so i can start planning and doing layouts for them back in my studio.


after that all that was left is packing all the work i have made up to be shipped home.  i got this huge bag of off cuts of foam for $20! in the end it looked like i didn't use any of it but it was very necessary to make sure things arrive safely.


everything is wrapped in many layers of bubble wrap and then packed into a box, putting foam around them and in between each piece making sure nothing can move in transit.


a few short hours later 5 boxes, packed and ready to get quotes. 

Monday, December 3, 2012

reverse roll ups - done

over the weekend i finished the last of my cold working on my blown work. here are the reverse roll ups that i have made during the residency.


i will think about adding imagery to these forms when i am back in my own studio. although i do like the simplicity of the plain colour and the fade of the colour and the form.


the next four roll ups had an image sandblasted onto them while they were still flat, so that the image gets rolled up. it also fire polished the sandblasting.


i like having the image on the glass before i roll it up, i will definitely make some more of these in the future.  i am still not sure if they are finished yet, or how they would be displayed, or even what they are but i like them.

Sunday, December 2, 2012

fire polishing done

as i said before i have a hard time throwing away parts of the glass that i cut away when making my flat sheets of glass.


these are the bottoms of the cylinders that i kept and did a little bit of cold working to. i decided to put them in the kiln to fire polish them so i can use them.


this is a piece i have hanging in my house made from the bottom of a cylinder. i want to make more similar to this.


this is them done, with the edges softened and the cut edges fire polished up, ready for some images.

Saturday, December 1, 2012

hot glass session prep

for my last 2 hot glass sessions i wanted to test out the process of sandblasting an image or pattern onto the glass before i heated it back up in the hot glass studio and rolled it up.


these are the plates i had ready for the roll ups.


then i made some stencils


and sandblasted the image though the top layer to reveal the white layer.
 

i wanted the images to be abstract and pixelated, like a super close up detail.


now they are ready to be picked up in the hot shop.

session 7

this is what the annealer looked like when it had cooled down after my 7th glass blowing session on wednesday. my last hot glass session was yesterday. it was a good week in the hot glass studio.


this means that for the next 2 days i will be in the cold shop finishing off all this work and more.
 

i did some interesting roll ups in my last session, i will blog about those soon.

fused and slumped scraps done

i tried to slump the fused glass scraps int he kiln, but for some reason even though i used a similar program to what i normally use this on broke on the way up to temperature.


so i tried another one, this time bringing the glass up tot temperature slower.
 

it worked so i slumped the last fused section too.
 

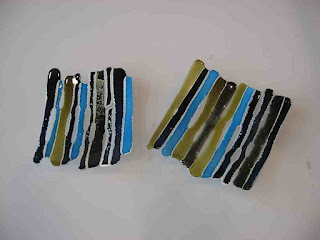
i wasn't sure what to do with these pieces so i decided to slump them into kind of useful/decorative bowls.


this it them complete, top view.


side view. i like them, and hope i can recreate the same thing again when i am in my own studio. 

Thursday, November 29, 2012

fusing glass scraps

maybe it is because it takes so much energy and work to make blown glass that i find it hard to throw away scraps of glass. these long strips are the parts i cut out from the cylinders that opened flat in one sheet.


i decided to put these strips together and then fuse them together in the kiln.


this was the result.
 

it was unexpected, and at first i did not like them, but after spending some time with them i decided that i did like them.
 

i am not sure what happened but fusing glass requires heating the glass up to 830 degrees celcius. i think that having the coloured glass sit at this temperature caused it to bubble and jump, escpecially the white.


usually when people form glass in a kiln it is with special kiln working glass that is formulated to be worked using slumping and fusing processes. I am kind of breaking the rules by doing this stuff with furnace glass. but hey, don;t know unless you try. i am not sure i could recreate the same results again. i will attempt it when i have more scraps back home.


in the meantime the next step i think will be to slump these fused sheets.